Walk Photographs and views from British Walks published during 2014

The boys on the summit of Mam Tor

Mozzer, Rob, Jimbles, Big Truck and me on the Hollins Cross ridge below summit of Mam Tor

Heading towards Hollins Cross, Back Tor (Hollins Cross) and Lose Hill (Ward
Heading towards Hollins Cross, Back Tor (Hollins Cross) and Lose Hill (Ward's Piece)

Back Tor (Hollins Cross) from Hollins Cross

Mozzer on Back Tor (Hollins Cross) with Lose Hill (Ward
Mozzer on Back Tor (Hollins Cross) with Lose Hill (Ward's Piece) in the background

Hollins Cross, Mam Tor and Lord
Hollins Cross, Mam Tor and Lord's Seat (Rushup Edge) from Back Tor (Hollins Cross)

Nether Booth nestling in the Vale of Edale below Kinder Scout from Back Tor (Hollins Cross)

Heading for Lose Hill (Ward
Heading for Lose Hill (Ward's Piece) from Back Tor (Hollins Cross)

Big Truck on Lose Hill (Ward
Big Truck on Lose Hill (Ward's Piece) with Birthday Cake

Mam Tor, Hollins Cross and Back Tor (Hollins Cross) from Nether Booth in The Vale of Edale

Near Nether Booth in The Vale of Edale

Murton Pike from near Dufton

Lone Tree near Knock

Backstone Edge and Brownber Hill from near Dufton Pike

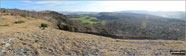
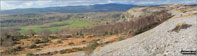
The Vale of Eden from the walk back into Dufton

Old Lime Kiln near Dufton

High Cup from a cairn on the Narrow Gate path (Pennine Way)

Looking across High Cup from the Narrow Gate path (Pennine Way)

High Cup in all its glory from the Narrow Gate path (Pennine Way) at High Cup Nick

South east edge of High Cup from the Narrow Gate path (Pennine Way) near High Cup Nick

Vince Wetton on the PYG Track en-route to Snowdon via Crib Goch in 2010

Vince Wetton on the summit of Snowdon (Yr Wyddfa) in 2010

Lovely shot of summer evening light on Dove Stone Reservoir near Greenfield

Dove Stone Rocks mirrored in a perfectly calm Dove Stone Reservoir near Greenfield

Stile on Chinley Churn

Scalebarrow Knott summit cairn

Swindale Beck
Swindale Beck

Hare Shaw summit cairn

Kit Crag (Naddle Forest) summit cairn

Harper Hills summit cairn

Wallow Crag (Naddle Forest) summit cairn

Haweswater Reservoir Dam from Hugh
Haweswater Reservoir Dam from Hugh's Laithes Pike summit cairn

Knipescar Common summit trig point

Naddle Low Forest summit cairn

Powley
Powley's Hill summit

Pen y Fan (left) and Corn Du from the top of Craig Cerrig-gleisiad

Rough Crag (Birker Fell) summit cairn

Water Crag (Birker Fell) summit cairn with Devoke Water beyond

The Knott (Stainton Fell) summit cairn

White Pike (Birkby Fell) summit cairn above Devoke Water

Yoadcastle summit cairn with Hesk Fell beyond

Woodend Height (Yoadcastle) summit cairn

Seat How (Birker Fell) summit cairn

Whiteside Pike summit beacon

Todd Fell summit
Todd Fell summit

Capplebarrow summit
Capplebarrow summit

Ancrow Brow (Swinklebank Crag) summit cairn

Ancrow Brow (North East Top) summit

Long Crag (Bannisdale Fell) summit

White Howe (Bannisdale) summit trig point

The Forest (Bannisdale) summit cairn

Lamb Pasture summit cairn

The Lammermuir Hills

North Berwick Law
North Berwick Law

Cat Bells (Catbells)

Brant Fell summit cairn

High Knott (Williamson
High Knott (Williamson's Monument) summit cairn

The beacon on the summit of High Knott (Williamson
The beacon on the summit of High Knott (Williamson's Monument)

Limestone Edge on Whitbarrow Scar

Reston Scar summit cairn

Lord
Lord's Seat (Whitbarrow Scar) summit

An Andy Goldworthy
An Andy Goldworthy 'Sheep Pen' in the valley below from the path between Little Dummacks and The Calf

Cartmel Fell (Raven
Cartmel Fell (Raven's Barrow) summit

Cautley Spout
Cautley Spout

Cautley Spout
Cautley Spout

The view from Cartmel Fell (Raven
The view from Cartmel Fell (Raven's Barrow)

The view from Great Dummacks

The cairn on the summit of Calders

The view from the summit of Lord
The view from the summit of Lord's Seat (Whitbarrow Scar)

The Calf trig point
The Calf trig point

Cyclist (and bike) on The Calf trig point

Walna Scar summit cairn

The view from the Walna Scar road

On Yarlside summit
On Yarlside summit

Wild Boar Fell (centre right with some snow on it) from Yarlside

Ruin on Yockenthwaite Moor

Gummer
Gummer's How summit trig point

Windermere from the summit of Gummer
Windermere from the summit of Gummer's How

Grey Friar (left), Dow Crag, Brown Pike and The Old Man of Coniston (right) from White Maiden

White Maiden summit cairn with Grey Friar (left), Dow Crag, Brown Pike and The Old Man of Coniston (right) in the background

Green Crag (Ulpha Fell) and Harter Fell (Eskdale) from White Maiden

On the summit of Hampsfell

Me at a cairn on the way up to Hampsfell

The hospice on the summit of Hampsfell

View indicator on the summit of Hampsfell

Morecambe Bay from the summit of Hampsfell

The trig point on the summit of Sharp Haw

Hampsfell from Humphrey Head

Windermere in autumn sunshine from Gummer
Windermere in autumn sunshine from Gummer's How

Crookrise Crag Top summit trig point

Embsay reservoir from Crookrise Crag Top

Waterfall Gill Beck on the way to Rylestone Fell and Cracoe Fell

Cracoe Fell summit obelisk

Rylstone Cross on Rylstone Fell

Ruin on the way to Upper Barden Reservoir

Thorpe Fell summit trig point

Snow on Whernside (left) and Pen-y-ghent from the path up Great Knoutberry Hill (Widdale Fell)

Humphrey Head summit trig point

Great Knoutberry Hill (Widdale Fell) summit trig point

Standing beside the summit trig point on Firth Fell

Buckden Moor from Firth Fell

Arten Gill Beck railway viaduct

A snow capped Pen-y-ghent from Great Knoutberry Hill (Widdale Fell)

A lizard in the grass on the way down from Birks Fell

A stone circle near Boat How

A stone circle near Boat How

Iron Crag summit cairn

Windermere from Staveley Fell summit cairn

Ravenglass from Irton Pike

Dodd Fell Hill summit trig point

An interesting cairn on Dodd Fell Hill

Drumaldrace (Wether Fell) summit cairn

Dixon Heights (Newton Fell) summit

Saskills (Newton Fell) summit

Drumaldrace (Wether Fell) and Sleddale from Dodd Fell Hill

Approaching the summit of Staveley Fell

Windermere from
Windermere from 'The Dead Larches' on Staveley Fell

On a very wet Striding Edge

Mike, Tim and Shaun at the summit trig point on a very wet Helvellyn - I swear there were seals on the summit!

Starting the descent from Helvellyn via Swirral Edge

A very grumpy Shaun post walk in Glenridding after scaling Helvellyn via Striding Edge on a very, very wet day!

Lord
Lord's Seat (Whitbarrow Scar) summit

Lord
Lord's Seat (Whitbarrow Scar) summit

Arnside Knott, Upper Allithwaite and High Park Wood from above Black Yews Scar, Whitbarrow Scar

Chapel Head Scar and Whitbarrow Scar from Witherslack Hall School

Looking east across Barker Bank to Backtor Nook and Back Tor (Hollins Cross) from Hollins Cross

Looking west to Lord
Looking west to Lord's Seat (Rushup Edge) from Mam Tor

The Vale of Castleton and Mam Tor (right) from Hollins Cross

East to Backtor Nook and Back Tor (Hollins Cross) from Hollins Cross

The view from the summit of Mam Tor

Kinder Scout from the summit of Mam Tor

Lord
Lord's Seat (Rushup Edge) from Mam Tor

Hollins Cross, Barker Bank, Backtor Nook, Back Tor (Hollins Cross) and Lose Hill (Ward
Hollins Cross, Barker Bank, Backtor Nook, Back Tor (Hollins Cross) and Lose Hill (Ward's Piece) from Mam Tor

Winnats Pass (centre left) from Mam Tor

Coniston Water from the summit of The Old Man of Coniston

Coniston Water from The Old Man of Coniston summit

Gurnal Dubs
Gurnal Dubs

Potter Tarn
Potter Tarn

Bosham Church
Bosham Church

Tomb inside Bosham Church

Inside Bosham Church

The Raptackle at Bosham

Bosham Church
Bosham Church

The Anchor Bleu, Bosham

Somme Cottage, Bosham

Chichester Cathedral

Chichester Cross
Chichester Cross

The M6 Motorway at Tebay from Grayrigg Pike (Grayrigg Forest)

The cairn on the summit of Grayrigg Pike (Grayrigg Forest)

Grayrigg Forest summit trig point

Grayrigg Forest Repeater Station Telecommunications Mast

Buckhill Hole
Buckhill Hole

Discarded log on White Moor

White Moor
White Moor

White Moor
White Moor

Small Pool on White Moor

Woodland on White Moor

In woodland on White Moor

Ancient woodland by Highland Water

Highland Water
Highland Water

On Cut walk
On Cut walk

Windfelled woodland by Highland Water

Highland Water
Highland Water

Looking across Bramble Hill

Walking Cut walk
Walking Cut walk

Lochan Meall an t-Suidhe from the Tourist Path up Ben Nevis

Me with Stuart Nicholson and Ryan McDowell on Scafell Pike.

Me on Helvellyn Summit

Loch Linnhe appearing out of the mist from the top of Ben Nevis

Looking east towards Loch Linnhe from the tourist path up Ben Nevis above Lochan Meall an t-Suidhe

Looking south east towards Loch Linnhe from the Fort William route up Ben Nevis

Looking south east towards Loch Linnhe from the Fort William route up Ben Nevis

Lord
Lord's Seat (Whitbarrow Scar) summit

Lord
Lord's Seat (Whitbarrow Scar) summit beacon

Trig Point on the summit of Grayrigg Forest

Telecommunications Mast from the Trig Point on the summit of Grayrigg Forest

Grayrigg Forest
Grayrigg Forest

Whinfell Beacon and the Repeater Station from Grayrigg Forest

Low Water on the way up The Old Man of Coniston

Coniston Water from The Old Man of Coniston

Doing the
Doing the 'Mobot' on the summit of The Old Man of Coniston

The
The 'Thumbs up' on the summit of The Old Man of Coniston

On the summit of The Old Man of Coniston

Buck Pike and Dow Crag from the summit of The Old Man of Coniston

Grayrigg Pike (Grayrigg Forest) summit cairn

The M6 Motorway at Tebay from Grayrigg Pike (Grayrigg Forest)

Grayrigg Forest Trig Point

Repeater Station on Grayrigg Forest

Woodland on Emery Down

Emery Down Church
Emery Down Church

White Moor
White Moor

Roman Bridge spanning Highland Water

New Forest Ponies near Allum Green House

Waymarker in Chawton Park Wood

Chawton Park Wood
Chawton Park Wood

Chawton Park Wood
Chawton Park Wood

Chawton Park Farm
Chawton Park Farm

In Peck Copse near Chawton

Bridge carrying the Watercress Line near Alton

Jane Austen
Jane Austen's House Museum, Chawton

Jane Austen
Jane Austen's House Museum from her garden, Chawton

On The St Swithun
On The St Swithun's Way near Chawton

Walking through Weathermore Copse on a lovely spring day

Gargoyle decorating the gates to Upper Woodside Farm

Medstead and Four Marks Railway Station on The Watercress Line

Snow on Black Sails summit cairn with Great Carrs (centre left) and Scafell Pike (far right) in the background

Coniston Old Man from Black Sails in the snow

Crinckle Crags from Pike de Build Moss

A dusting of snow on Crinckle Crags from Great Moss

Pillar Rock from Robinson
Pillar Rock from Robinson's Cairn

Pillar (left) and Pillar Rock from Robinson
Pillar (left) and Pillar Rock from Robinson's Cairn

My boyfriend being accosted by a cow on Lord
My boyfriend being accosted by a cow on Lord's Seat (Whitbarrow Scar) summit

Cow on Lord
Cow on Lord's Seat (Whitbarrow Scar) summit

Bell Rake above Low Park Wood on the way up Whitbarrow Scar

Whitbarrow Scar from Witherslack Hall School

Path up through Black Yews Scar from Witherslack Hall School to Lord
Path up through Black Yews Scar from Witherslack Hall School to Lord's Seat (Whitbarrow Scar)

Path up through Black Yews Scar from Witherslack Hall School to Lord
Path up through Black Yews Scar from Witherslack Hall School to Lord's Seat (Whitbarrow Scar)

Path up through Black Yews Scar from Witherslack Hall School to Lord
Path up through Black Yews Scar from Witherslack Hall School to Lord's Seat (Whitbarrow Scar)

Path up through Black Yews Scar from Witherslack Hall School to Lord
Path up through Black Yews Scar from Witherslack Hall School to Lord's Seat (Whitbarrow Scar)

Lord
Lord's Seat (Whitbarrow Scar) summit beacon

Arnside Knott and Upper Allithwiate from above Black Yews Scar, Whitbarrow Scar

Whitbarrow Scar from half-way up Black Yews Scar

Hikers Rest in Beck Head (Witherslack)


'Duck', Mill Side (Witherslack)

Spring sunshine in Mill Side (Witherslack)

Mill pond in Mill Side (Witherslack)

Blease Fell from Borrowdale Wood

Jeffery
Jeffery's Mount and The M6 Motorway (right) from the lower slopes of Grayrigg Forest

Blease Fell (left), Fell Head (Howgills) and The Calf (right) above Low Carlingill from the lower slopes of Grayrigg Forest

Cleugh Gill (left) and Blease Fell from the lower slopes of Grayrigg Forest

Powson Knott from the lower slopes of Grayrigg Forest

Great Coum (left), Greyrigg Pike and Little Coum (right) from the lower slopes of Grayrigg Forest

Blease Fell (left), Fell Head (Howgills) and The M6 Motorway from the stream crossing on the lower slopes of Grayrigg Forest

The M6 Motorway and a Wind Sock on the lower slopes of Grayrigg Forest

Birk Knott, Jeffrey
Birk Knott, Jeffrey's Mount, The M6 Motorway, Powson Knott, Blease Fell, Fell Head (Howgills) and The Howgill Fells from Grayrigg Pike (Grayrigg Forest)

Grayrigg Pike (Grayrigg Forest) summit cairn with Blease Fell in the background

Blease Fell and The Howgill Fells 2000ft
Blease Fell and The Howgill Fells 2000ft'ers - Randygill Top, The Calf, Calders and Fell Head (Howgills) - from Grayrigg Pike (Grayrigg Forest) summit

The view south-east and west from the summit of Grayrigg Pike (Grayrigg Forest)

Grayrigg Forest summit trig point with The Howgill Fells in the background

Telecommunications Mast on Grayrigg Forest

The Repeater Station on Grayrigg Forest with Whinfell Common in the background

Whinash, Winterscleugh, Roundthwaite Common, Belt Howe, Birk Knott, Casterfell Hill and Jeffrey
Whinash, Winterscleugh, Roundthwaite Common, Belt Howe, Birk Knott, Casterfell Hill and Jeffrey's Mount from The Repeater Station on Grayrigg Forest

Borrow Beck flowing through Borrowdale (Howgills) with Whinfell Common (left) and Winterscleugh (right) from the lower slopes of Grayrigg Forest

Single stone hut on the slopes of Jeffrey
Single stone hut on the slopes of Jeffrey's Mount from Borrowdale Wood

Looking SSE from the summit of Simon
Looking SSE from the summit of Simon's Seat (Wharfedale) - a thick mist lies over the lower fells in the distance

Looking WNW from the summit of Simon
Looking WNW from the summit of Simon's Seat (Wharfedale)

Simon
Simon's Seat (Wharfedale) summit from the West - the figures (middle right) give a sense of scale

Approaching the summit of Simon
Approaching the summit of Simon's Seat (Wharfedale) from the NW

Lyndhurst
Lyndhurst

Lyndhurst Toll Gate
Lyndhurst Toll Gate

Daffodils and a Thatched Cottage at Swan Green, Lyndhurst

Lyndhurst Church
Lyndhurst Church

Walking through Cheriton Wood

Bramdean Common
Bramdean Common

Woodland near Cheriton

Looking South across Foulshaw Moss to Milnthorpe Sands, Arnside Knott and The forest of Bowland from Buckhouse Wood above Mill Side

The path through Buckhouse Wood

Looking South across Foulshaw Moss to Milnthorpe Sands, Arnside Knott and The forest of Bowland from Mill Side

On Whitbarrow Scar (Farrar
On Whitbarrow Scar (Farrar's Allotment)

The path across Farrar
The path across Farrar's Allotment on Whitbarrow Scar

Farrar
Farrar's Allotment, Whitbarrow Scar

Large Cairn on Whitbarrow Scar

One of several large cairns on the Whitbarrow Scar ridge

Witherslack Hall School from Whitbarrow Scar

Another of the several large cairns on the Whitbarrow Scar ridge

Witherslack Hall School, Whitbarrow Scar and Lord
Witherslack Hall School, Whitbarrow Scar and Lord's Seat (Whitbarrow Scar) (in distance, far right)

On Whitbarrow Scar
On Whitbarrow Scar

Lord
Lord's Seat (Whitbarrow Scar) from one of the large cairns on the Whitbarrow Scar ridge

Arnside Knott, Humphrey Head, Dixon Heights (Newton Fell) and Saskills (Newton Fell) from the Whitbarrow Scar ridge

Walking along the Whitbarrow Scar ridge

Dixon Heights (Newton Fell) from Pether Pots on the Whitbarrow Scar ridge

Lord
Lord's Seat (Whitbarrow Scar) from Flodder Allotment, Whitbarrow Scar

Crags on Flodder Allotment, Whitbarrow Scar

Crags on Whitbarrow Scar (Flodder Allotment)

Approaching Lord
Approaching Lord's Seat (Whitbarrow Scar)

South from Lord
South from Lord's Seat (Whitbarrow Scar)

Local on Lord
Local on Lord's Seat (Whitbarrow Scar)

Lord
Lord's Seat (Whitbarrow Scar) summit cairn

The Southern Lake District Fells from Lord
The Southern Lake District Fells from Lord's Seat (Whitbarrow Scar) summit

Cave entrance near Bell Rake, Whitbarrow Scar

Descending Bell Rake, Whitbarrow Scar

Woodland path below Bell Rake, Whitbarrow Scar

Path through Low Park Wood, Whitbarrow Scar

The trig point on the summit of White Edge (Big Moor) (South East Top)

Beeley Church
Beeley Church

Plaque detailing the history of St Anne
Plaque detailing the history of St Anne's Church, Beeley

Sign on a fence in Beeley

Footpath to Beeley Hilltop Farm from Beeley

Horses in a field, Beeley

Beeley Village
Beeley Village

Cottage in Beeley Village

Beeley Plantation
Beeley Plantation

Beeley Brook in Beeley Plantation

Beeley Brook in Hell Bank Plantation, Beeley

Stone barn above Smeltingmill Wood near Beeley

Green lane below Smeltingmill Wood near Beeley

Fields near Smeltingmill Wood near Beeley

Beeley Brook in Beeley village

Two huge stone buttresses in Smeltingmill Wood near Beeley

Cunswick Scar summit cairn

Scout Scar (Barrowfield) from Cunswick Scar summit

Underbarrow from Cunswick Scar

The view from Scout Scar (Barrowfield)

Scout Scar (Barrowfield) summit

Scout Scar (Barrowfield)

Brigsteer from Scout Scar (Barrowfield)

Old milepost on the Brigsteer Road

The River Wye at Bakewell

Swans on The River Wye at Bakewell

The Monsal Trail at Bakewell

Moatless Plantatiion on Calton Pastures

The small pool on Calton Pastures

Lees Moor Wood trig point

Lees Moor Wood (South East Top) summit

In Manners Wood
In Manners Wood

Path through Manners Wood

Footbridge over the River Wye in Haddon Park

Haddon Hall Gatehouse, Haddon Park

White Edge (Big Moor) (South East Top)

Nelson
Nelson's Monument (Birchen Edge)

Birchen Edge
Birchen Edge

Nelson
Nelson's Monument (Birchen Edge) from Birchen Edge trig point

The three huge rocks known as
The three huge rocks known as 'Three Ships' on Birchen Edge

Birchen Edge summit trig point

The view from Birchen Edge summit

The view from Birchen Edge summit

The view from Birchen Edge summit

Rough Track above Beeley Plantation

Path across Rabbit Warren, Beeley Moor

Hob Hurst
Hob Hurst's House, Beeley Moor

Hob Hurst
Hob Hurst's House Information Board, Beeley Moor

Harland Edge, Beeley Moor

Beeley Moor Summit
Beeley Moor Summit

Beeley Moor (South East Top) Summit Trig Point

Ancient Guide Stoop/Sign Post SW of Beeley Moor Trig Point

Ancient Guide Stoop/Sign Post SW of Beeley Moor Trig Point

Ancient Guide Stoop/Sign Post SW of Beeley Moor Trig Point

Ancient Guide Stoop/Sign Post SW of Beeley Moor Trig Point

Ancient Guide Stoop/Sign Post South of Harland Sick

Ancient Guide Stoop/Sign Post South of Harland Sick

Ancient Guide Stoop/Sign Post South of Harland Sick

Ancient Guide Stoop/Sign Post South of Harland Sick

Modern sculture beside the Ancient Guide Stoop/Sign Post on Beeley Road south of Harland Sick

Beacon Fell (Forest of Bowland) summit trig point

Whins Brow summit trig point

Hob Hurst
Hob Hurst's House on Beeley Moor

Harland Edge on Beeley Moor

Harland Edge on Beeley Moor

Ruin on Beeley Moor
Ruin on Beeley Moor

Shooting Butt on the summit of Beeley Moor

The view from the summit of Beeley Moor

Shooting Butt on Beeley Moor

Trig Point on Beeley Moor (South East Top)

Ancient Guide Stoop/Sign Post SW of Beeley Moor Trig Point

Ancient Guide Stoop/Sign Post on Beeley Lane near Harland Sick

Ancient Guide Stoop/Sign Post on Beeley Lane near Harland Sick

Bar Brook at Baslow Nether End on the way into Chatsworth Park

The Bridge over Bar Brook at Baslow Nether End on the way into Chatsworth Park

The Tall Rotary Gate allowing entrance to Chatsworth Park from Baslow

Jubilee Rock in Chatsworth Park

Footbridge over Heathy Lea Brook near The Robin Hood, Baslow

The Chequers Inn on the A625 bewteen Froggatt and Curbar

The well in the Curbar Village

Baslow Edge from below

Baslow Edge and Squeezer Stile from below

Footpath sign below Baslow Edge

Track leading to Bar Road, Baslow Bar near Lady Wall Well

Track leading to Bar Road above Baslow Bar from near Lady Wall Well

Baslow from near Lady Wall Well

Baslow from near Lady Wall Well

Baslow from near Lady Wall Well

Chatsworth House - setting for the BBC
Chatsworth House - setting for the BBC's 'Death Comes to Pemberley' drama - enjoying some late afternoon winter sun


Do not miss our pick of the Best Walks in the UK


Follow go4awalk.com on Twitter Follow go4awalk.com on Facebook


Find new Friends to go walking with

Walk all 214 Wainwrights in just 59 Walks. Download GPS Waypoints - Great Walks you must not miss!

Walk The Yorkshire Three Peaks Challenge Walk - All the Latest Route Information, GPS Waypoints and Split Times to keep you on Schedule

Walk The British Three Peaks Challenge Walk - All the Latest Route Information and GPS Waypoints

See our pick of The Best Walks in The Lake District - Great Walks you must not miss!

Walk our pick of the Best Lake District Ridge Walks - Great Walks you must not miss!

Walk our pick of the Best Lake District Walks to do in the rain - Great Walks you must not miss!

Walk our pick of The Best Walks in Snowdonia - Great Walks you must not miss!

Walk our pick of The Best Ridge Walks in Wales - Walks you must not miss!

Walk our pick of The Best Walks in The Brecon Beacons - Great Walks you must not miss!

Walk our pick of The Best Walks in The Yorkshire Dales - Walks you must not miss!

Walk our pick of The Best Walks in The Peak District - Walks you must not miss!

Walk our pick of The Best Walks in The Forest of Bowland - Walks you must not miss!

Walk our pick of The Best Walks in Shropshire - Walks you must not miss!

Walk our pick of The Best Walks in Cheshire - Walks you must not miss!

Walk our pick of The Best Walks in Lancashire - Walks you must not miss!

Not sure where to walk next? Try Peak Bagging - Great Walks you must not miss!

Not sure where to walk next? Walk part of a National Trail - Great Walks you must not miss!

Walks with Downloadable and Uploadable GPS Waypoint Data

Walking Kit and Gear Tested by Walkers

Full Site Search